Follow-up: How architecture diagrams enable better conversations

My previous post was pickup and shared on Hacker News, there was lots of really good discussion in the comments, and there were a number of points raised which I thought would make a good follow up blog post.

There were a few main themes in the comments:

  • There was broad consensus that architecture diagrams are helpful/useful for teams
  • There were lots of different tools/methods that people use for architecture diagrams, although a reasonable number have used/use C4
  • Diagrams are expensive or difficult to maintain
  • Blog post about architecture diagrams, without any diagrams!?

I wanted to touch on a few of these points and share a few more thoughts and reflections prompted by the various comments.

Continue reading on unravelled.dev

How architecture diagrams enable better conversations

Earlier this year myself and a couple others at DrDoctor did some training in C4 Architecture modelling. The trainer was really good and over a few sessions with him we got the hang of the method. We went onto use what we had learnt, meeting everything Thursday over the course of 3 months. We focused mainly on modelling our existing architecture into Level 1 (Context) and Level 2 (Container) diagrams. This process was enlightening and we all learnt a lot from it – that alone could easily be a couple of posts.

I have had two main takeaways:

  • From the training itself, is that the C4 method provides a consistent language which can be used when talking about architecture
  • From using and applying the C4 method, is that diagrams can be an enabler for better conversations

Before digging into the benefits that come from having C4 diagrams, there are two limitations in particular that I would like to highlight.

  1. The C4 Model does not provide a standard way of communicating the story of your architecture in written form. Given all the things it does well, provides consistent language, introduce detail/complexity incrementally through different levels of diagrams, this felt like an oversight and something that would be really useful to have.
  2. The lack of real-world examples available – this obviously isn’t a limitation of the model itself but rather due to the fact that companies don’t want to advertise their architecture in detail in public. However it does mean that understanding how to practically apply the model outside of the public examples available is difficult.

Continue reading at unravelled.dev

Using ChatGPT to learn how to use JMeter

A little while ago now, my team at work was looking at improving the performance of a FHIR Server API. Thanks to Azure Workbooks, we’ve already been able to identify a bottleneck with the underlying data storage resource – CosmosDB. Now, as we explore options to enhance performance, we need a way to reliably benchmark the server. These benchmarks will help us measure the impact of any changes we make to the configuration and infrastructure. It’s in this context that load testing tools can be really helpful as they offer up insights into an applications performance under stress.

Continue reading on Unravelled.dev

Announcing a new blog and a new platform

Over the years I’ve enjoyed blogging on WordPress, starting back in 2013 it has done me well. However now I feel it’s time to move on. This site will remain live, however for all new content I’ll be posting over at https://www.unravelled.dev

My first new post since the end of 2020 is already live, and titled Deploy Windows Services to a Virtual Machine with Azure DevOps head over to check it out now.

Azure ARM templates: Conditionally add an access policy to a Key Vault

Putting time and effort into developing Azure ARM templates for infrastructure deployment pays off in the long term, especially when all teams across an organisation adopt the same patterns. Recently at DrDoctor we’ve been developing an approach to generating boilerplate templates for new projects/service areas, but more about that in another post.

So I thought there must be a way in the ARM template to conditionally add an access policy when running the ARM template in our test environment. A quick google search led me to this stack overflow answer. However, unfortunately the accepted answer didn’t actually work, so I set out to figure it out myself.

Continue reading “Azure ARM templates: Conditionally add an access policy to a Key Vault”

Performance tuning stored procedures – when indexes aren’t the problem

Recently I have been doing performance tuning on a few stored procedures that power some of the most important parts of DrDoctor. Whilst I’m confident to say I can read query execution plans much better now that I could 6 months ago that isn’t the biggest takeaway. What I’ve noticed with two stored procedures in particular is that the reason they are running slowly is because they were both reading lots and lots of data from one or two tables which was then slowly whittled away into practically nothing.

Take the most recent stored procedure I had to tune. This stored procedure finds slots for patients to book into for their up and coming hospital appointment.

1-query-plan-1

As you can see the final output of the query is 98 rows, yet if you look at the far right the highlighted table which contains the slots selects out over 1 million rows, which are eventually reduced down to pretty much nothing.

In this post I’m going to show how after making a few minor changes this stored procedure went from taking just over 30 seconds to finishing in under 1 second!

Tuning the performance

The first thing that I did was look at the execution plan, my initial observations were:

  • Final row count is 98
  • Selecting over 1 million rows from the slots table – this just feels wrong!
  • What is that sort operation doing in there
  • Looks like there are a few big and nasty key lookups

Fix attempt 1: I added a new non-clustered index to the slots table to try and reduce the amount of data that is being pulled back, this didn’t work however it did remove the sort operator.

2-sort-operator-gone

You can see from the above that we are still selecting out over a million rows from the slots table. It’s now dawning on me that the indexes isn’t really the problem, but rather it’s the query that needs to be addressed.

Looking more closely: In the query we have a bunch of INNER JOINs one of which joins onto the slots table, in the WHERE clause of the query we do some date filtering on the time range of the slots based on data from another table. What this means is that SQL Server selects out all the slots in this table and then carries all this data around until finally it filters the data down.

Fix attempt 2: Adding date filtering to the INNER JOIN predicate on the slots table to only select future slots

3-future-slots-only

This change has made a noticeable difference as now only ~600,000 rows are being returned. This is a move in the right direction, but I’m sure that more changes could be made.

Looking more closely: Having made some progress in the right direction I went back to the query. I know the solution is to filter that slots table down right at the source, so I started looking for more ways to do that. The query currently has a CTE that selects a row of data about the appointment that is being booked and then this CTE is joined to the main query.

Fix attempt 3: I changed the CTE to join to a configuration table and find for me the MIN/MAX range of slots that should be selected, then instead of joining the CTE to the main query I declared a bunch of variables and used the CTE to give them their values. Then I removed the CTE from the main query and used the variables, I also then changed the slots INNER JOIN to select slots based on the date range using the MIN/MAX calculated previously.

4-more-specific-date-range

As you can see this is still moving in the right direction, the number of rows being returned now is down to 324,000 – still a lot, but significantly less than the million I started with!

Looking more closely: I now started to look more broadly to see if it was possible to reduce the 324,000 rows earlier in the query plan. When deciding if a slot is suitable we have to look at the “session instance” (hospital lingo) and make sure that it is “allowed to be booked”, this involves a join to a reference table.

Fix attempt 4: This time I changed the session instance INNER JOIN predicate to also say where the TypeId IN (SELECT TypeId FROM TypeTable WHERE AFlag = 1)

5-more-innerjoin-predicates

This hasn’t reduced the amount of slots rows that were being selected but it did mean that SQL Server was carrying them around in memory for less time – a good thing! (This is obvious if you compare this query plan to the one above)

Looking more closely: I’m now increasing in confidence and sure that there is more room for improvement. Looking back at the query I see that we also do some filtering on the slots table based on a booking status type, which again involves a join to a reference table

Fix attempt 5: Similar to fix attempt 4 I updated the slot table INNER JOIN predicate

6-nailed-it

Nailed it! Take a look at the query plan above, the SQL Server optimizer is now clever enough to find that there are only 336 session instances, it then does a Nested Loops operator with these 336 rows against the slots table to return 1,145 slots rows! This down from 1,094,032 rows in the first execution plan!

Looking more closely: I haven’t finished with this query yet, looking back at the execution plan I can see that when SQL Server does the key lookup on the slots table it only finds 234 slots that match the final condition.

Fix attempt 6: I added a new non-clustered index on the columns SQL wants to filter on and includes the others it needs to return.

7-finished

With the non-clustered index added when SQL Server goes to the slots table it only returns 234 rows.

The query now finishes in under a second! What a huge improvement. There’s probably more room for improvement, but at this point I’m pretty happy with the improvement.

Reduce the data, then look at Indexes

As you can see from the above working out of my thoughts indexes weren’t the actual problem with the query. The problem was that too much data was being selected out of a very large table. With a little bit of work (this took me about 2.5 hours) I was able to reduce the number of rows from 1,094,032 down to 234!

In the end an index did help, but arguably the query probably performance just as well without an additional non-clustered index.

Getting out of “a variable nightmare” – or how I learnt to let go and embrace conventions

I’ve recently been doing some work automating the release of our integration projects to our various clients, I was reviewing the work that had been done last week and noticed that there were a lot of variables being defined. If we continued on this course as we added new clients we would end up adding between 3-5 new variables, multiple that by say 100 new clients and soon we would have an incredible amount of variables to deal with.

In our project we use Octopus environments to represent our different clients; you can see from the image below that we were defining a lot of different variables for each of our clients.

variables-before

As you can see above with only a handful of clients it’s already getting out of control – there has to be a better way!

Embrace convention, simplify your life

Consistency by convention

It struck me that we had inadvertently created a few conventions in the way we were defining different variables.

For example we had the following variables defined for each of our environments:

  • Client Staging DB, which represents the name of a database used by an ETL process these all took the form Client_[client name]
  • Client Staging User ID which took the form Staging_[client name].

These two variables (along with Client Staging Password) are used in the Client – National Conn String variable.

It dawned on me that with a very simple convention I could get rid of most of these repeated variables.

So instead of continuing on creating scoped variables for each of our clients (environments) I embraced the Octopus Environment Name variable. Now all of these existing variables that were scoped to each environment have been deleted and now there is a single variable shared by all environments.

Client – National Conn String has been replaced with

Data Source=xyz;User Id=Client_#{Octopus.Environment.Name};Password=#{Client Staging Password};Initial Catalog=Staging_#{Octopus.Environment.Name};Provider=SQLNCLI11.1;

This means longer having to define the Client Staging DB and Client Staging User ID variables.

There were a bunch of other variables that I went through and updated to use the same convention. After making this change I went from having 38 variables, down to 22.

variables-after

We now have an opinionated deployment process, which comes with some some big advantages:

  • The process is easier to reason about
  • Everything is consistent
  • Less setup work when on-boarding new clients

But it’s good to be flexible

There is still room for exceptions, take the Client – Local Conn String variable, I was able to standardize this for all of our clients except for the one where we run our database on their cluster. For them I have a variable scoped just to their environment.

Octopus Deploy makes it easy to be flexible with variable scoping.

Variable sets reduce noise

The other trick that I’ve used is putting groups of related variables into their own variable sets. They are great for sharing variables between projects, but I’ve used them to remove noise from the project variables listing.

No pain no gain

It’s worth mentioning there was a little bit of pain, not all of the environments were configured consistently, not all of the SQL users were named according to the convention. Which meant a bit of manual work fixing things up; but in the long run it’ll pay off.

Distributed multi-tenanted releases with Octopus Deploy

TL;DR; read the Octopus guidance, adopt the “environment per tenant” approach, try to make your process consistent across tenants and use scoped variables to make steps re-usable, keep complexity out.

In my last couple of posts I’ve written about the various aspects involved with automating the release of our client integration projects. I’ve shown how to get TeamCity to build Integration Services projects and then how to deploy them into SQL Server SSIS Catalog with Octopus Deploy.

In this post I’m going to explain how we setup Octopus Deploy for distributed multi-tenanted deployments.

octopus-dashboard

What is a distributed multi-tenanted deployment?

A tenant in the context of DrDoctor it is a hospital. As mentioned in a previous post, when DrDoctor starts working with a new hospital we do some bespoke integration work to integrate their PAS system with our system. This ETL process is made up of a couple of staging databases and some SSIS packages which orchestrate the ETL process.

For each hospital that we work with, we are given a virtual machine within their network to which we deploy a database and a set of SSIS packages. We then have a schedule job that:

  • Performs an ETL process on the client machine to transform the data from their PAS system into our schema
  • Transfers the transformed data from the client site to our central database running in our data center.

So in our context we have a mixed deployment topology, some components go to a virtual machine running in a remote data center and some components go to our servers running in another data center.

Setting up Octopus Deploy

Octopus Deploy already has some very helpful guidance around different ways that it can be set up to support multi-tenanted deployments. There are broadly speaking two approaches: environment per tenant or project per tenant.

The process which I opted for was environment per tenant, in this approach there is a single project which contains all the different steps and variables, and multiple environments which represent the various tenants.

The reason I opted for environment per tenant is that our release process is the same for each of our clients, this keep the overhead of maintenance low and the process of setting up a new client easy.

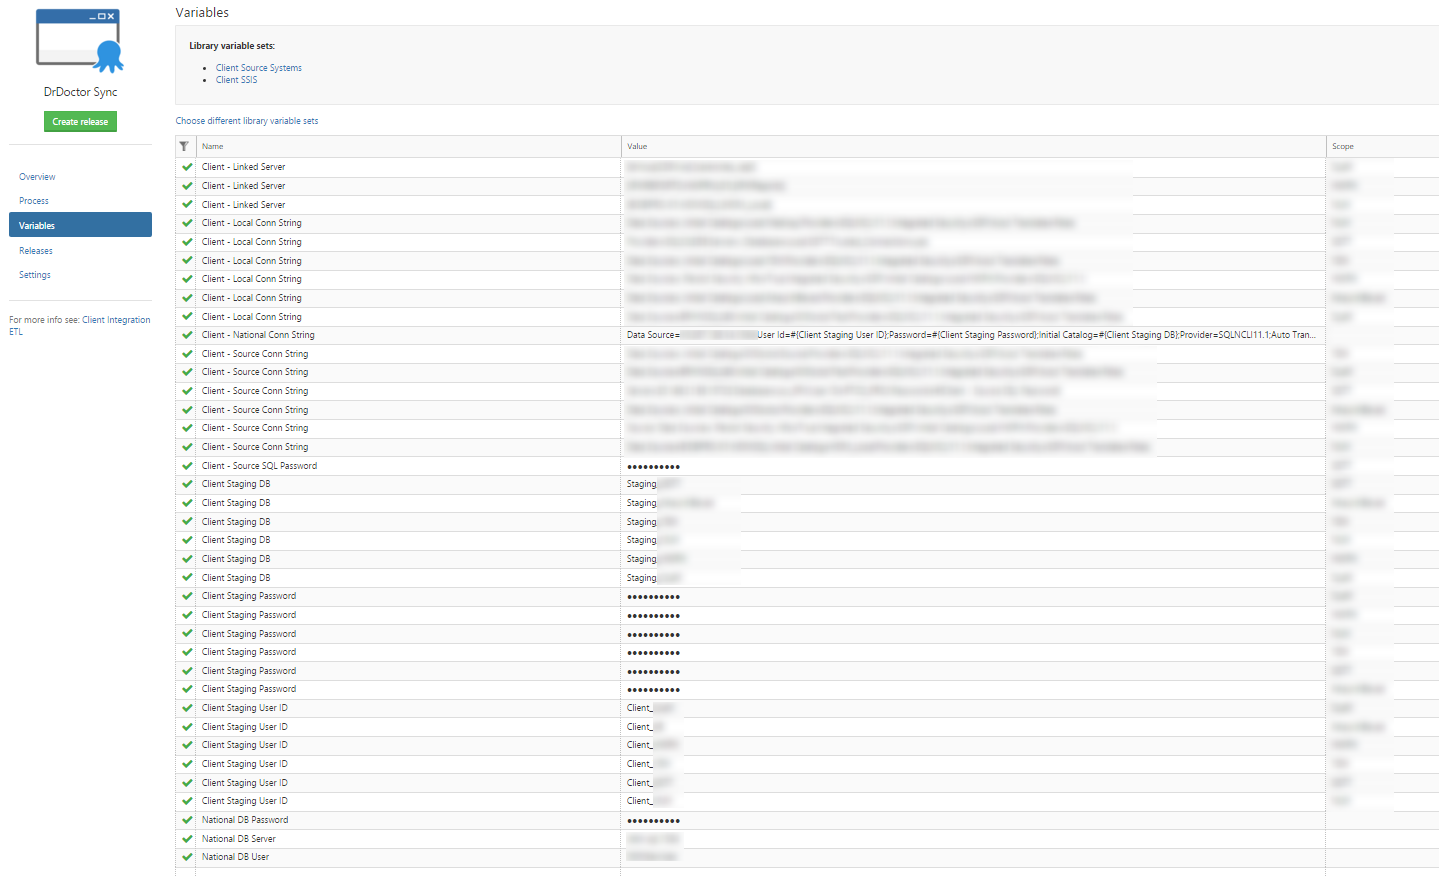
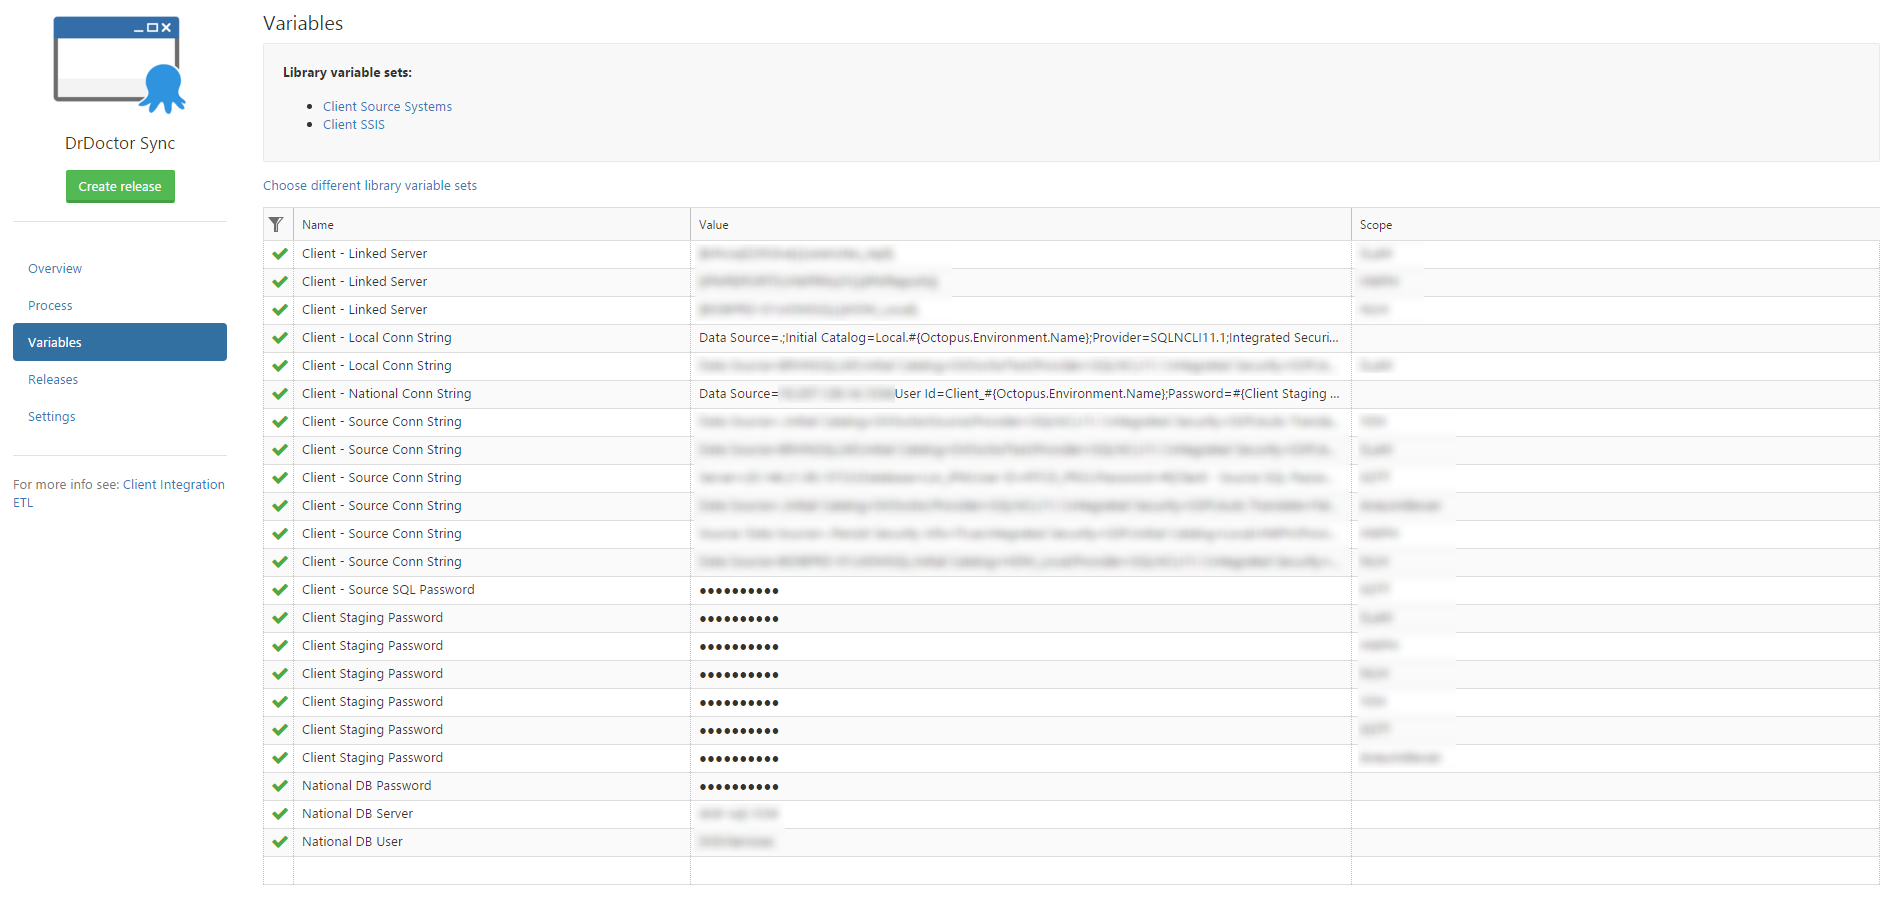
setting up the environments

As per the Octopus guidance (linked to above) I created an environment for each of the hospitals DrDoctor currently works with. At this time they are all configured with an offline package drop deployment target while we work with the various IT departments to get their firewalls to allow the Octopus tentacles to communicate with our Octopus server.

environments

I also added to each environment a listening tentacle deployment target for the tentacle inside our data center, this the same tentacle but with multiple environments applied to it.

shared-tentacle

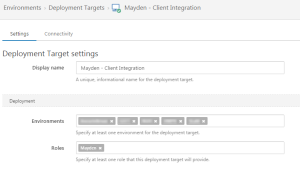
I also created a new release life cycle for this project, which treats all the environments as equals.
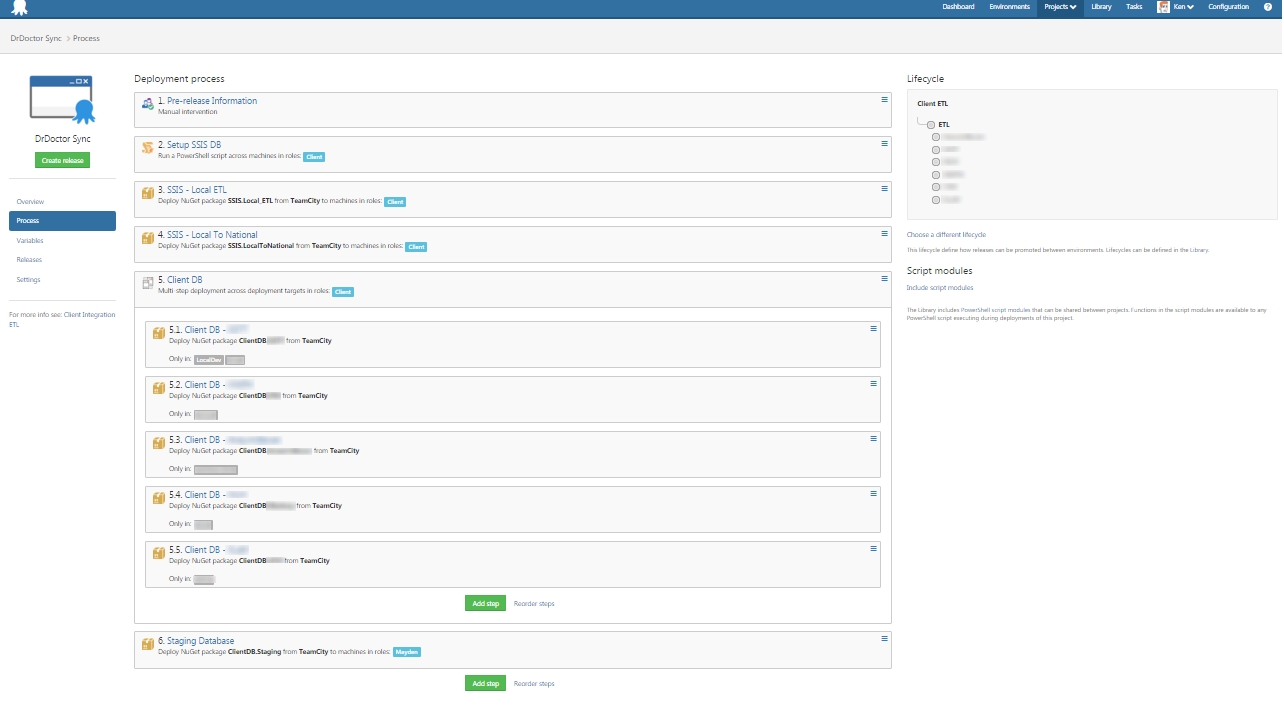
etl-lifecycle

The release process

This is the release process at time of writing.

release-process
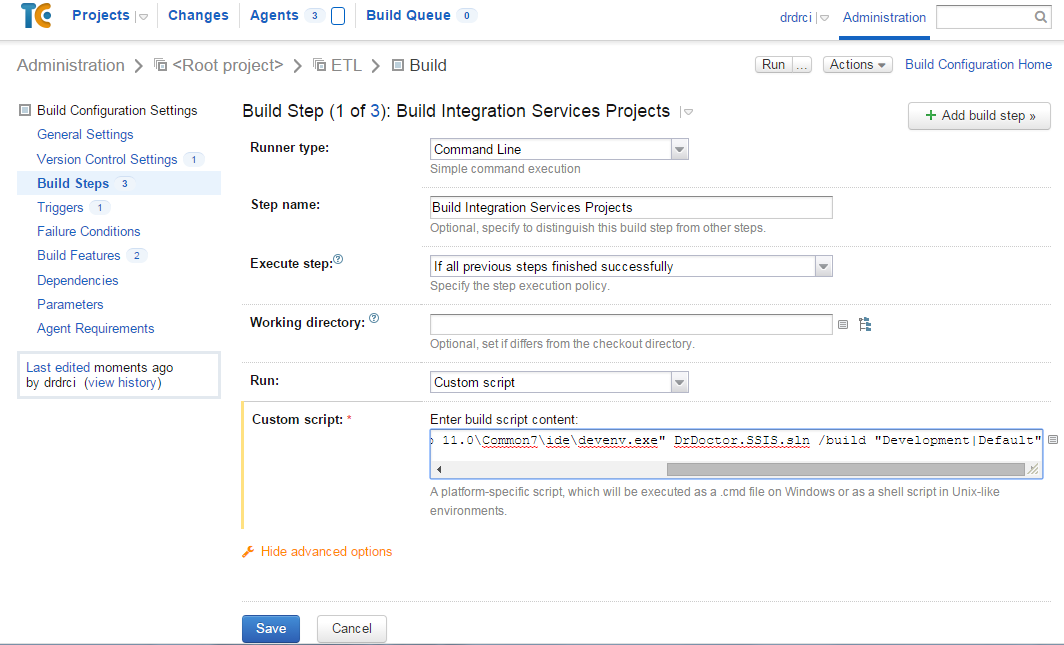
Steps 2-4 and 6 I covered in my previous post about deploying SSIS projects with PowerShell and Octopus Deploy. All of these steps make use of environment specific variables so they will work uniformly across all of our clients.

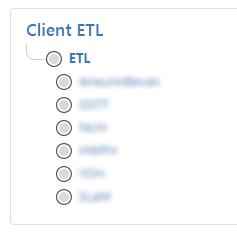
The step that is interesting is actually step 5. As I noted above, we have to do bespoke integration work for each of our clients, this involves writing custom transforms (stored procedures) and having a different set of database tables to which we import data from and to.

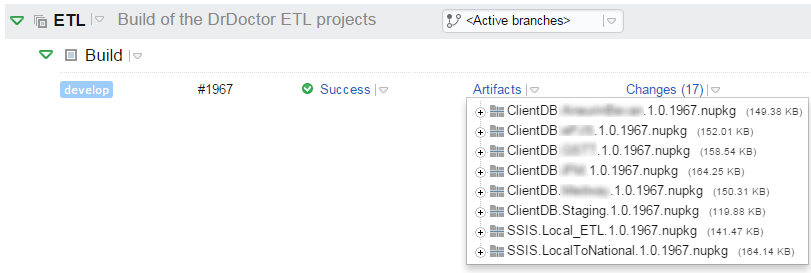
In Visual Studio we have a SQL database project for each of our clients (Local.ClientX), with all the common objects in a referenced database project. The client specific database project contains the transform stored procedures, import tables and client specific data mappings.

database-projects

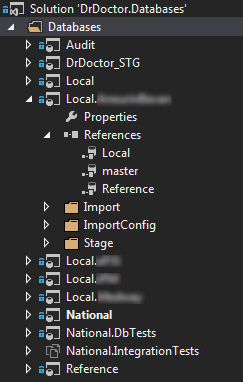
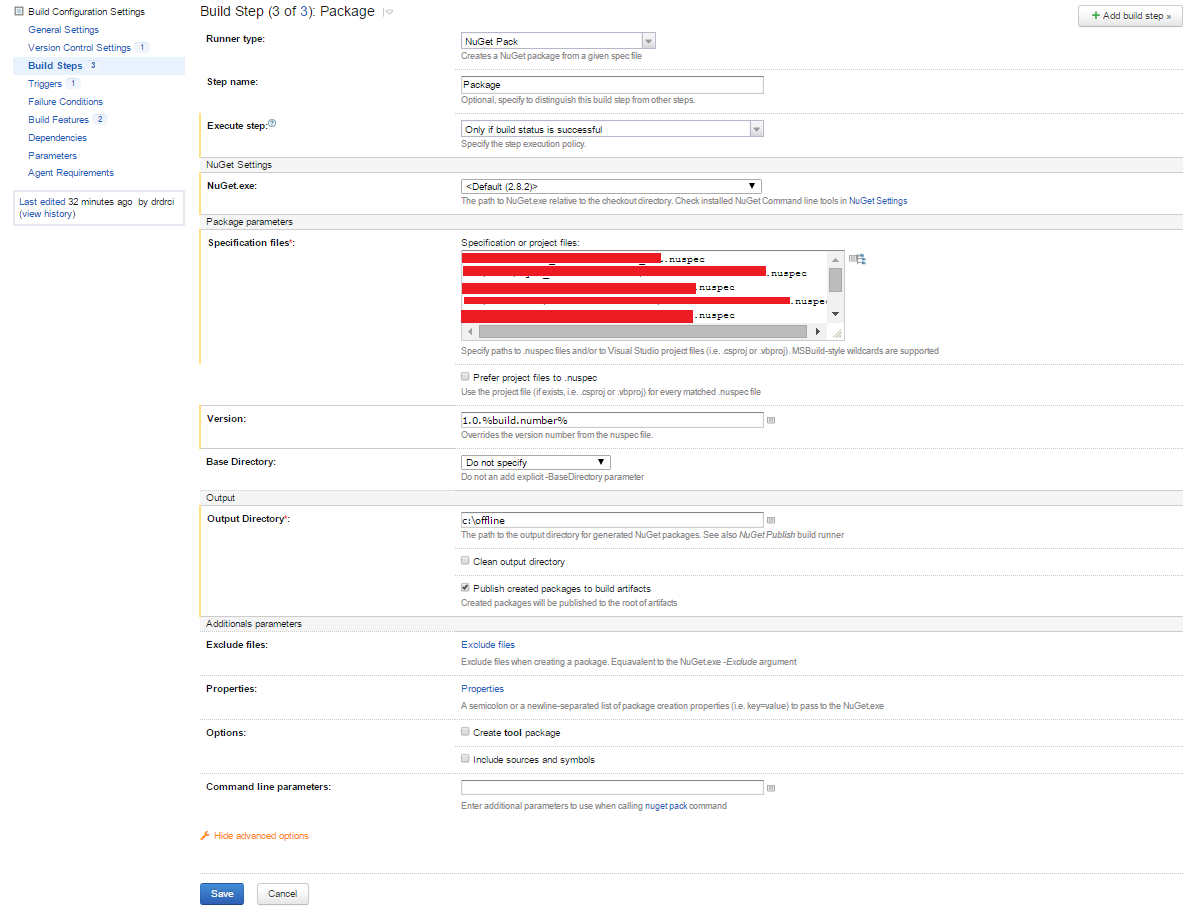
Each of these database projects are built by TeamCity and turned into NuGet packages for Octopus Deploy.

database-projects-in-teamcity

In step 5 there is a step for each of our different clients, with each step being scoped to a specific environment. The actual work being done in each of the sub-steps are identical with the exception of the NuGet package which is being deployed.

Configuring step 5 was the only point where I felt that the functionality of Octopus Deploy was lacking elegance. It would be much nicer to have a single step which dynamically picked the correct NuGet package based on the environment variable.

That wasn’t possible as far as I could see, hence why step 5 has lots of duplication.

Roles

There are two roles:

  1. client role – this is for all steps that should be run on the client integration machine
  2. mayden role – this is for the steps that should be run on our central server

Using roles allow us to control where each of the steps are run.

Introducing Offline package drop

At time of writing we haven’t yet negotiated with the various IT departments to allow the tentacles to get through their firewalls. However, with the release of Octopus Deploy 3.x this is no longer a deal breaker thanks to a new feature called offline package drop.

This is one of a number of new deployment targets that have been added in version 3.x. When you deploy a release to an offline package drop the Octopus server will create a local directory for that release/environment and bundle up all the release artifacts (NuGet packages, PowerShell scripts etc) and create a handy script which can be run to deploy the release. This is the perfect feature where you can’t have either a listening or polling tentacle.

So the release process now becomes:

  • Create a new release in Octopus
  • Deploy the release to one or more environments
  • Zip the deployment folder and copy to the client machine
  • Execute the deployment script

Assuming everything worked the client is now on the latest release.

Multiple deployment targets

One of the great features about Octopus Deploy is how the environments can be configured. As I showed above, in our environments we two deployment targets each scoped to specific roles. This becomes really handy when trying to coordinate different steps across different machines.

In our scenario, the way it has been configured is to have all the client specific steps go to the offline package target, and the step for our central server will go to the listening tentacle and therefore be executed without any manual work by the person doing the deployment.

The other nice thing is that once our clients start opening their firewall we can swap out the offline package drop with a listening or polling tentacle and the release process will just work as is.

Thoughts and advice

One of the biggest problems I was trying to address with all this automation was fear or more specifically releasing is really hard…so I’ll avoid it as much as I can. Before we automated the process we would often over point user stories that involved making changes to our ETL process because releasing was so hard.

One of the consequences I believe that has come out of this is that we will as time goes in build confidence in releasing changes, and therefore more easily make changes. There are loads of things we would like to do to our ETL process to make the actually process more efficient, or refactor some of the data structures. My hope is that all those little things we’ll start doing because it’ll no longer be a big scary release.

The main advice I would give to someone looking to use Octopus Deploy for multi-tenanted releases is this: adopt the environment per tenant and only one project approach. This might mean a little bit of pain making everything uniform, but it will reduce your overhead and give you a much simpler process to reason about.

The more I use Octopus the more it shows itself to be extremely flexible and suited to many different scenarios, but at the same time it doesn’t have to be complicated, you could very easily have a simple project up and running in an afternoon.

Go forth and automate.

Deploying SSIS projects with Octopus Deploy

In my previous blog post I outlined how to configure TeamCity to build SQL Server Integration Services projects and then package the ispac file into a NuGet package.

In this post I’m going to show how I set up Octopus Deploy to deploy the ispac to SQL Server 2012 and configure SSIS DB projects and environments.

Deployment Overview

Here is an overview of the process as is currently defined in Octopus Deploy.

1-process-overview

We are doing multi-tenanted releases for this project, which is why the Client DB (Step 4) is repeated multiple times. In a future post I’m going to cover off details about how we are doing multi-tenanted releases.

Setting up SSIS DB

The first step in the release process is to ensure that the SSIS DB is up to date for use with our SSIS projects, within this step we ensure that:

  • A project folder exists within SSIS DB for our ispac to be deployed into
  • An environment exists
  • Environment variables are up to date

All of this is achieved with a little bit of PowerShell

$folderName = $OctopusParameters['SSISDB FolderName']
$environmentName = $OctopusParameters['SSISDB EnvironmentName']

$loadStatus = [Reflection.Assembly]::Load("Microsoft.SqlServer.Management.IntegrationServices, Version=11.0.0.0, Culture=neutral, PublicKeyToken=89845dcd8080cc91")

# Store the IntegrationServices Assembly namespace to avoid typing it every time            
$ISNamespace = "Microsoft.SqlServer.Management.IntegrationServices"            
            
Write-Host "Connecting to server ..."            
            
# Create a connection to the server            
$constr = "Data Source=localhost;Initial Catalog=master;Integrated Security=SSPI;"            

$con = New-Object System.Data.SqlClient.SqlConnection $constr

# Create the Integration Services object            
$ssis = New-Object $ISNamespace".IntegrationServices" $con

if ($ssis.Catalogs.Count -eq 0)
{
    Write-Error "SSISDB doesn't exist"
    throw "SSISDB doesn't exist"
}

$cat = $ssis.Catalogs["SSISDB"]

if ($cat.Folders[$folderName] -eq $null)
{
    Write-Host "Creating new folder" $folderName
    $newfolder = New-Object $ISNamespace".CatalogFolder" ($cat, $folderName, "Description")     
    $newfolder.Create()
}

$folder = $cat.Folders[$folderName]

if ($folder.Environments[$environmentName] -eq $null)
{
    Write-Host "Creating environment" $environmentName
    $newEnv = New-Object $ISNamespace".EnvironmentInfo" ($folder, $environmentName, "Descriptoin")
    $newEnv.Create()
}

$env = $folder.Environments[$environmentName]

Write-Host "creating variables"

if ($env.Variables["Local"] -eq $null)
{
    $env.Variables.Add("Local", [System.TypeCode]::String, $OctopusParameters['Client - Local Conn String'], $false, "Our local client db")
}
else
{
    $env.Variables["Local"].Value = $OctopusParameters['Client - Local Conn String']
}

# create other environment variables here...

#save changes to environment
$env.Alter()

(NB: This script and the subsequent one for deploying the ispac are based off this example by Matt Masson)

I’ve tried to write this script to be idempotent so that it can be run multiple times without causing any problems.

Here is what you will see in SQL Management Studio after this step has run:

2-ssisdb-with-folder

Deploying SSIS Projects

The next step is to actually deploy the Integration Services project into the SSIS DB. In this step we use a PowerShell script to:

  • Deploy the ispac into the project folder that was created in the previous step
  • Ensure that the project has a reference to the environment that was created in the previous step
### Static Variables

$localToLocalETLFullPath = ".\DrDoctorClientETL.ispac"
$folderName = $OctopusParameters['SSISDB FolderName']
$environmentName = $OctopusParameters['SSISDB EnvironmentName']
#the projectName needs to match the output name that has been specified on the project, you can see this in the properties in SQL Server Data Tools
$projectName = "DrDoctor Client ETL"

###

$loadStatus = [Reflection.Assembly]::Load("Microsoft.SqlServer.Management.IntegrationServices, Version=11.0.0.0, Culture=neutral, PublicKeyToken=89845dcd8080cc91")

# Store the IntegrationServices Assembly namespace to avoid typing it every time            
$ISNamespace = "Microsoft.SqlServer.Management.IntegrationServices"            
            
Write-Host "Connecting to server ..."            
            
# Create a connection to the server            
$constr = "Data Source=localhost;Initial Catalog=master;Integrated Security=SSPI;"            
            
$con = New-Object System.Data.SqlClient.SqlConnection $constr      
# Create the Integration Services object            
$ssis = New-Object $ISNamespace".IntegrationServices" $con
$cat = $ssis.Catalogs["SSISDB"]
$folder = $cat.Folders[$folderName]

Write-Host "Deploying project ..."            
[byte[]] $projectFile = [System.IO.File]::ReadAllBytes($localToLocalETLFullPath)            
$folder.DeployProject($projectName, $projectFile)

#####

Write-Host "adding reference to environment"

$project = $folder.Projects[$projectName]
$env = $folder.Environments[$environmentName]

if ($project.References.Count -eq 0)
{
    $project.References.Add($env.Name, $folderName)
}
else
{
    Write-Host "assuming that the correct environment has been configured"
}

####

Write-Host "applying environment variables to project"

$targetVar = $env.Variables["Local"]
$sourceVar = $env.Variables["Source"]

Write-Host "Updating Extract package parameters"

$extractPackage = $project.Packages["Extract.dtsx"]

$extractPackage.Parameters["CM.Target.ConnectionString"].Set([Microsoft.SqlServer.Management.IntegrationServices.ParameterInfo+ParameterValueType]::Referenced, $targetVar.Name)
$extractPackage.Parameters["CM.Source.ConnectionString"].Set([Microsoft.SqlServer.Management.IntegrationServices.ParameterInfo+ParameterValueType]::Referenced, $sourceVar.Name)

$project.Alter()

After this step has run the Projects folder will contain the first of our SSIS projects:

3-ssisdb-with-project

Deploying a database project

In a previous blog post I showed how you can fiddle with the dtproj and add a reference to the Octopack NuGet package to have TeamCity turn your database project into a NuGet package for you.

However, since discovering how to use NuSpec files in TeamCity I’d now recommend against changing your dtproj file and instead moving to using a NuSpec to define the package.

Here is a sample NuSpec file that I started using this week

<?xml version="1.0" encoding="utf-8"?>
<package xmlns="http://schemas.microsoft.com/packaging/2010/07/nuspec.xsd">
  <metadata>
    <id>ClientDB</id>
    <version>1.0.0</version>
    <authors>DrDoctor</authors>
    <requireLicenseAcceptance>false</requireLicenseAcceptance>
    <description>Client database</description>
  </metadata>
  <files>
    <file src="bin\Release\ClientDB.dacpac" target="ClientDB.dacpac" /> 
    <file src="bin\Release\Reference.dacpac" target="Reference.dacpac" /> 
  </files> 
</package> 

(You can adapt this as you need for your requirements)

As shown in my previous post on building SSIS projects in TeamCity you will need to add this NuSpec file the list of packages to build within the NuGet Packaging step to have TeamCity build the NuGet package.

Once TeamCity is building the NuGet package, we can add a new Deploy NuGet Package step in our Octopus Deploy project, with the follow PowerShell script as a custom deployment script.

Here is the PowerShell script which will generate an upgrade script using SqlPackage.exe

$dbName = $OctopusParameters['Client Staging DB']
$server = $OctopusParameters['National DB Server']

$releaseNumber = $OctopusParameters['Octopus.Release.Number']

& 'C:\Program Files (x86)\Microsoft SQL Server\110\DAC\bin\SqlPackage.exe' /Action:Script /OutputPath:Upgrade.$dbName.$releaseNumber.sql /SourceFile:DrDoctor_STG.dacpac /TargetServerName:$server /TargetDatabaseName:$dbName /p:IncludeCompositeObjects=true

New-OctopusArtifact -Path "Upgrade.$dbName.$releaseNumber.sql"

This will compare the dacpac to the database, if the database doesn’t exist then the upgrade script will create it, otherwise the upgrade script will contain a bunch of sql commands to upgrade the database to match the dacpac.

The New-Artifact command is a useful Octopus Deploy function that tells the tentecle to grab the file and make it part of the release, so it’s then available from within the Octopus Deploy web ui.

release-artifacts

Alternatively, if you’re game you could configure SqlPackage to automatically upgrade the database by using Action:Publish instead.

In the next blog post I’ll be covering multi-tenanted releases with Octopus Deploy and using the Offline Package Drop feature which was new in 3.0.

Disclaimer: the PowerShell could definitely do with some tidying up, don’t hold that against me 🙂

Building and packaging SQL Server Integration Services projects in TeamCity

At DrDoctor we’ve been using Octopus Deploy for about a year and half now, and in that time we have developed a very robust way of releasing the core of our system. That is, two IIS websites and a bunch of windows services. Release automation has vastly increased the frequency at which we release software into production and in turn the speed at which the business can operate.

The missing part in all of this are the integration projects, when DrDoctor begins working with a new hospital we do a bunch of work integrating their PAS system into our system. This takes the form of a couple of staging databases and a couple of SQL Server Integration Services (SSIS) projects.

Whenever we are discussing changes that need to be made we always screw up our faces at the thought of doing the release. We also have no idea which clients have which version, or when we last did a release.

In this and a few subsequent posts I’m going to outline the various steps that I took to automate our deployments, so we can get on doing the interesting work and let the computers handle the boring deployment work.

Building SSIS Projects in TeamCity

The first step required is to have TeamCity build our Integration Services (SSIS) projects in TeamCity. In reality all it’s really doing is taking all the .dtsx packages that are part of the project and turning them into an ispac file.

The ispac is basically a zip file that contains all the packages and some other metadata which is used when deploying into SQL Server SSISDB.

There are two methods that come up from a Google search on getting TeamCity building SSIS projects, the first involves using a community MSBuild extension and a bunch of other bits, you can read more about it here or here, you can find the MSBuild extension on CodePlex. I tried this method, but didn’t have immediate success.

The second option is to use Visual Studio (SQL Server Data Tools) devenv.exe to build your project, this was already installed on our build server as it is required when building database projects.

To do this in the TeamCity project’s build configuration I added a new build step, which was a Command Line runner:

1-building-ssis-devenv

In the custom script I put in the full path to devenv.exe, our SSIS projects are built in SSDT BI 2012 (Visual Studio 2012 shell) so I’m using that version of devenv.exe on the build server.

Packaging SSIS Projects for deployment

Now that TeamCity is building the project it time to setup TeamCity to package the ispac file into a NuGet package. As mentioned in the intro, we use Octopus Deploy as our deployment system, it in turn uses the NuGet package format as the container for application files (more details).

Setting up TeamCity to automate the creation of NuGet packages turns out to be really easy.

Creating a NuSpec file

The first step is to create a NuSpec file, this is the manifest file that TeamCity will use when building the NuGet package (it tells TeamCity which files to include in the package).

To set this up I added a new file called Local_ETL.nuspec into my project folder with the following content

<?xml version="1.0" encoding="utf-8"?>
<package xmlns="http://schemas.microsoft.com/packaging/2010/07/nuspec.xsd">
  <metadata>
    <id>SSIS.Local_ETL</id>
    <version>1.0.0</version>
    <authors>DrDoctor</authors>
    <requireLicenseAcceptance>false</requireLicenseAcceptance>
    <description>Sync client to local</description>
  </metadata>
  <files>
    <file src="bin\Development\DrDoctor Client ETL.ispac" target="DrDoctorClientETL.ispac" />
  </files>
</package>

This as you can specifies a NuGet package ID, a version and a bunch of files that should be included.

Add build step in TeamCity

The next and final step is to configureTeamCity to create the NuGet package using the NuSpec file.

In TeamCity go into the Build Steps of your project, and click Add build step. From the runner type select NuGet Pack and configure the step with the following:

1-teamcity-nuget-packaging

Make sure that you have ticked “Publish created packages to build artifacts”. This will ensure that the packages are available through the built-in NuGet repository.

In the next post I’ll show how I setup my deployment project in Octopus Deploy to deploy the SSIS ispac to SQL Server SSISDB.

Stay tuned.